Clinical Notes Formatting
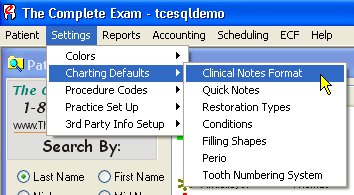
 As shown at right, you can set up the format for clinical notes by accessing the set up screen through the menu selections of Settings - Charting Defaults - Clinical Notes Format. These settings apply only to clinical notes that are generated during an active charting session. Once a charting session is closed, notes from that session can not be altered in any way, including changing the formatting.
To learn how you can filter and search notes from prior charting sessions, please click here.
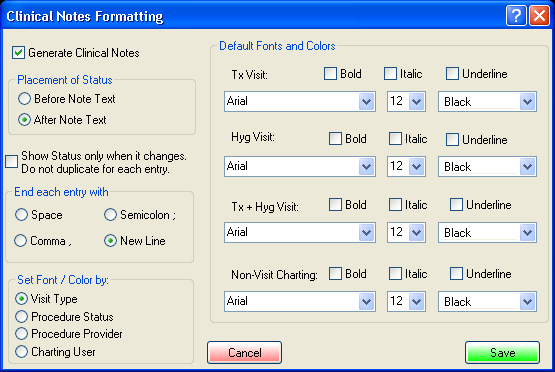
The Clinical Notes Formatting screen allows you to determine several things about how clinical notes are formatted when automatically generated, and even whether they are generated automatically at all.
Note in the screen shot below that Generate Clinical Notes in the upper left corner is checked to be on. This causes the program to automatically generate a clinical note, formatted as specified in the other parts of the dialog box, and using the text specified in the Clinical Notes Text setup area for each procedure that you input in the Smart Chart.

Continuing down the left side of the formatting setup screen, Placement of Status sets the location of the status of a procedure, if status is used in the text of the note. See the section on Automatic Clinical Notes setup in our regular help file installed with TCE for details on using status. If status is used in the automatic notes, the results would be like “Proposed MOD Resin #3” if set to “Before Note Text.” It would read “MOD Resin #3 Proposed if set to “After Note Text.”
Show Status only when it changes allows repetitive status listings to be eliminated. For example, if the box is checked to not duplicate status for each entry, you will get notes that are like this: Proposed MOD Resin #3; MO Resin #2; DO Resin #4; Existing Extraction #5. Note that the status “Proposed” was not repeated for each successive proposed item, but the status of Existing was put in when you changed your input status of Proposed to Existing. As a hint, showing the status only when it changes is most useful when using something other than the New Line to end each note. If all notes are ended with a New Line, making the notes line up in a column, then letting the status repeat can be clearer.
End each entry with When inputting a procedure, the specified text for that procedure is automatically placed into the clinical notes at the location of the cursor, which you will not be able to see as you are doing your charting. For this reason, we have a spot for you to select how you want each entry to end. Ending with a New Line, as chosen in the example here, makes the system paste in each text phrase with each procedure, and at the end of the text, it places a New Line command. Doing this manually by typing, you would have hit the Enter key at the end of the line to begin a new line. This choice makes each new procedure note begin on its own new line, and you wind up with a clinical note that contains a vertical list of procedure notes, neatly arranged for easy review.
Ending with one of the other choices is useful for those notes that expect to have additional comments appended to them. Ending with a semicolon or a comma puts the appropriate punctuation mark, plus a space, after the text, setting the cursor directly into position for the next phrase to come along. Entering several procedures in the Smart Chart with one of these choices will result in each new automatic text entry to be added to the end of the last entry. You would then have a running paragraph of entries, one after the other, with the lines wrapping automatically to the next line as necessary to fit into the screen width. Ending with a space simply puts a space after the entry to separate it from the next entry generated. Again, lines wrap automatically to fit the screen width.
Beginning with TCE version 3.3.2, clinical notes are stored in Rich Text Format (RTF). This allows for a variety of fonts, colors and effects to highlight information. You may use the lower left area of the setup screen to tell TCE how to color the text of automatic notes.
There are 4 possible methods for setting the font colors for the individual procedure notes that will be automatically generated during charting:
| 1) By Visit Type - |
the generated notes will use the same color as the note header. |
| 2) By Procedure Status - |
the generated notes will use the charting status color. (proposed = red, completed = blue, etc) |
| 3) By Procedure Provider - |
will use the provider's color code from provider setup |
| 4) By Charting User - |
will use the color code from provider setup for the user that logged into the current charting session. |
These settings only change the color of the note text. The font face, size, and effects will be as set by the visit type in the right side of the setup screen.
In addition to choosing the default font color, you may also select the font itself and font effects for each visit type. When a charting session is opened, the formatting will be set to the default based on the visit type. These settings will by used for the "Chart opened by ..." header section at the beginning of the note.
A common use of the selectable fonts will be to distinguish notes by Visit Type so is easier to scan a long list of notes for specific information.
You may still over-ride the settings during the session for any portion of the clinical notes. For example, different providers might use different colors, or you might change colors within a charting session to distinguish or highlight a specific section of the note as shown below.
During a Charting Session, you can change any of the font/color/effects settings at any time. If a block of text is selected (by swiping it with your mouse), when making the change, only that block is affected. If the cursor is positioned at the end of the note when changing settings, all new notes after that position will be inserted with the new settings. If you wanted to highlight a particular phrase in your notes, you could swipe it and make if bold, italics and bright red color if you wished.
Here's an example of different fonts, colors, and effects:
 Notes can now include various fonts, sizes, colors and effects. The defaults are based on the visit type, but may be changed at any time during the charting session to highlight certain entries. The swiped text in the example above is ready to be changed.
In addition to the Bold, Italic, and Underline buttons, there are Cut, Copy, Paste, and Undo buttons so these operations can be triggered with a mouse instead of using the common Windows shortcut keys of CTRL-X, CTRL-C, CTRL-V, and CTRL-Z. These shortcut keys may still be used if you wish.
As you can see in the example above, you could wind up with a rainbow effect in the notes which will make the use of color, fonts and effects much less effective. In fact, it could become very distracting, so be sure and use these features with discretion and forethought.
While there is no way to disable these features, you can effectively do so by setting all the font color, types and effects to the same standard values. That way, all clinical notes will be inserted in standard text colors, fonts and sizes no matter how they were automatically entered. You could still, of course, swipe any text you like and manually change any of the attributes as you wish. That has been done in the example back up at the top of this page where all fonts are set to black with a standard Arial 12 point font and no effects such as bolding, italicizing, etc.
It is important to realize that once recorded and the charting session is closed, you can no longer modify the text attributes, just as you can't modify the text of the notes itself. To allow that would cause the clinical notes to lose their evidentiary value should you need them in court.
The Clinical Notes editor also includes new controls for common editing functions and is compatible with other RTF-capable editors such as Microsoft Word or WordPad. This means that the formatting will be preserved if you copy text from the clinical note for pasting into another program. You can also take a document created in another program and paste sections of it into clinical notes. Any fonts, colors, and effects will be preserved.
The Clinical Notes editor will not accept imbedded images. It is text-only. Documents containing imbedded images should be saved in the Smart Docs section.
 As shown at right, you can set up the format for clinical notes by accessing the set up screen through the menu selections of Settings - Charting Defaults - Clinical Notes Format. These settings apply only to clinical notes that are generated during an active charting session. Once a charting session is closed, notes from that session can not be altered in any way, including changing the formatting.
 Notes can now include various fonts, sizes, colors and effects. The defaults are based on the visit type, but may be changed at any time during the charting session to highlight certain entries. The swiped text in the example above is ready to be changed.