Installing a Merging Smart Doc When Using Microsoft Word 2007
If you are using Microsoft Word 2007
(from MS Office 2007), you will quickly find that many things work
quite differently from the way they used to work in previous versions
of Word. Some program functions are now called by different names or have
been moved to a different location in the menu system. This is particularly true in the
area of merging documents with external data. These changes actually make it
easier to use form fields, such as checkboxes, dropdowns or fill-in fields
in a Smart Docs document. To take advantage of these changes in Word 2007
you need to make minor changes to the Word 2007 configuration to add some
hard-to-find features to the normal menu. You also need to follow some steps
when creating the merge documents that are slightly different from the Word 2003
instructions. Also, Word 2007 includes a new method called "Mark as Final" that can make the
merge fields, such as patient name,address, etc., become locked against future changes for the
saved, completed document. Use of this feature offers some benefits, but it also
places additional restrictions on how the document can be used. See below for a full
description of the trade-offs involved.
Here's how to use merge documents with
Smart Docs when you are using MS Word 2007 using our prescription form
as an example. Our prescription form was created with MS Word 2003 as
supplied on our CD.
Since our supplied prescription blank
form already contains all the necessary merge fields as well as some
form fields (checkboxes, a dropdown choice box, and a fill-in field, I
won't go into the actual creation of the document. Creation of merge
documents should already be explained in our TCE help file. If you wish
to practice with this example file, please copy it from the
distribution CD's \TCEData\TCEData\Docs directory into your computer
and work with it from there. It's name is RX-Blank.doc.

Using
our normal setup procedure for adding a template document to Smart
Docs, you select the "create from file" radio button and browse to and
select the appropriate file. Then on the next screen, shown at right,
set up your defaults for outgoing type, to "patient" from "dr", name of
the document (RX-Blank for example), description of the document (Blank
prescription form, for example), and whether you would like the
document to be temporary by default (meaning that you could delete it
later if you like). When you actually use the document, you can change
any of this information at that time.
After setting those defaults, click on
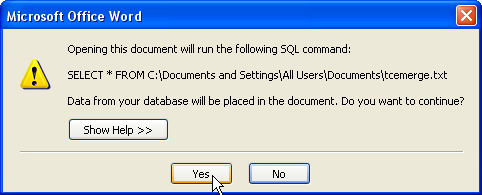
"Save" and you will be prompted to allow running the SQL query for the
merge fields as the document opens up as shown immediately below.
Answer yes, and it will open up the prescription form showing the
various merge fields by their field names in the places where data will
go as shown further below in the screen capture.

The document will now be opened in
Word 2007, and the associated database containing the information for
the merge fields, which will be created automatically for you by TCE in
the appropriate location on your hard drive, will be connected.
However, the merge field names will be showing instead of the merge
information, as shown below.
If you wish, you may edit the document as desired, such as typing in a
real prescription's information in the middle of the form. In any
event, you will probably want to test the merge to see if it works. To
do so, in the Microsoft Word 2007 tool ribbon, click on the "Mailings"
tab, and then the "Preview Results" button to see the data within the
fields as you see below.
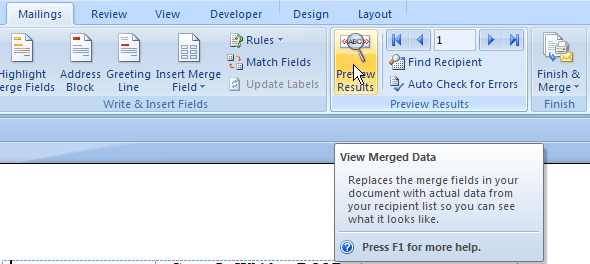
Click preview results (above) to see the merge data in place (below)
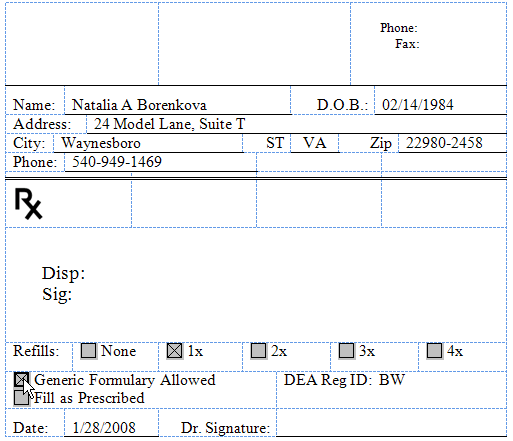
Unfortunately, it is not possible to
click checkboxes as pointed to by the cursor above because the form controls only function when
the form is "Protected." This is a change in terminology from Word 2003, where this was called
"Locking a form." When form controls are not protected, you can change the layout of the document
by adding, moving, deleting the controls and otherwise making edits to the document.
In order to actually use the controls, the document must be protected.
The "Protect Document" function of Word 2007 that is easiest to find in the menu,
under Developer - Protect Document, can not be used because it does not work correctly
with merged data such as patient name and address. Instead, you will need to re-configure
your Word 2007 Quick Access Bar to provide a shortcut to the correct function.
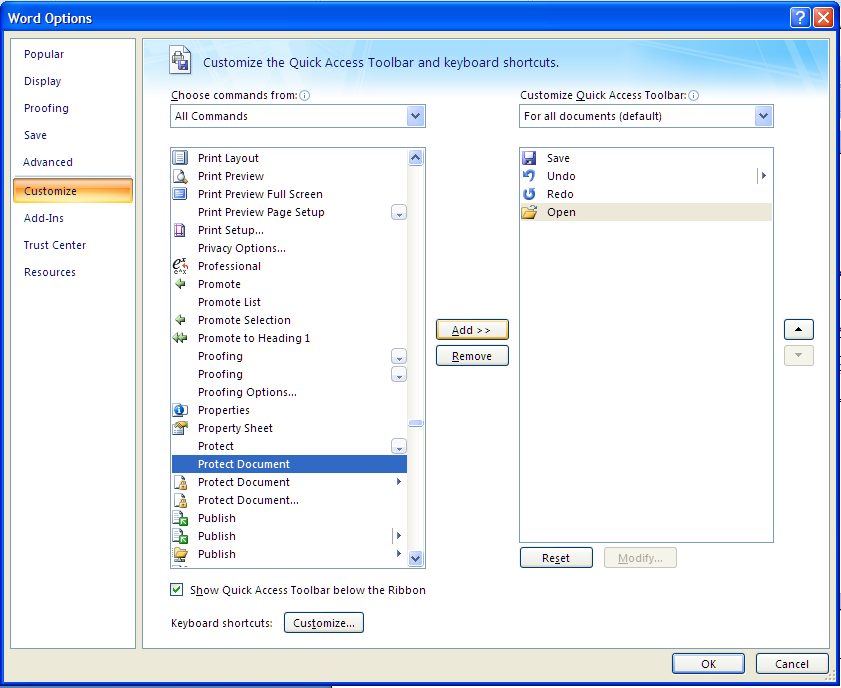
First, in the Quick Access bar click the arrow to drop the menu, then choose "More Commands..."
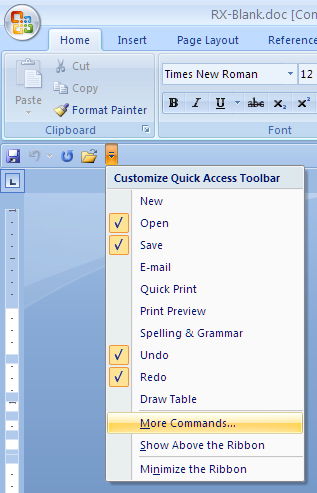
Next, under "Choose commands from" select "All Commands." Scroll down to find "Protect Document"
Select the first of three choices, the one with no icon on the left side. Finally, click the "Add" button to
add this choice to your Quick Access bar, then select "Ok" to see the bar. This step only needs to be done one time, and Word 2007
will remember this setting for the future. You may wish to repeat this process on each workstation
that will be used for working with Smart Docs in TCE.
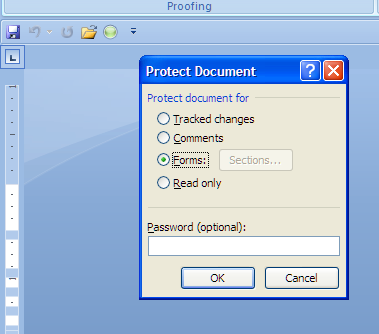
Now, you have a new icon on the Quick Access bar that looks like a green glass ball. Clicking on
this icon brings up a "Protect Document" menu. Choose "Forms:" and click OK.
Once the forms are protected, you can set and clear checkboxes by clicking on them, use drop-downs,
or any other of the Word form fields. The advantage with Word 2007 is that you can do
this even while the merge fields are displaying the preview results. You should leave the
document in this state, with Preview on and with the forms locked, when saving it to create a
Common Document for TCE. After you close MS Word and your prescription (or other document you may be
working on) will be saved to the Smart Docs button or list as you chose
when you started this set up procedure in TCE. You will now be able to
use this document in a patient's file whenever you like. To use the
document, follow the directions below in the second part of this
instruction document.
Using a Merging Smart Doc with Microsoft Word 2007
To create a Smart Doc for a
patient, from that patient's Smart Docs tab, click on the button or
select from the dropdown list the desired document, such as our
prescription, as appropriate to open the document. Allow the SQL query
to run as above, and the document opens to show the merge fields by
name, also as above.
If the original document was saved as instructed above, with "Preview Results" enabled,
the patient data will be displayed. If Preview is not on (as it may be if the documents were
originally created and added to TCE using Word 2003), you will need to turn off Protection
before you can change the "Preview" setting. The green "Protect" icon added to the Quick Access
bar works as a switch. If the document is protected, you will not be able to change the
"Preview Results" setting or do any other editing of the document. Just click the green "Protect"
icon, and the protection will be turned off. In the MS Word tool ribbon, click on the "Mailings" tab and then on
"Preview Results" to show the actual patient data, just as described
above, and leave the preview turned on. With protection off, you can type into any areas
of the document as needed. To make changes to the checkboxes, click the green "Protect" icon again,
and choose "Forms:" which will allow the form controls to function.
Marking as Final
If the prescription (or other document) is correct, you may optionally choose
to mark it as a final document before closing Word. To do this, click on the
round "Office Button" in the upper left corner of the Word window. From
the dropdown, select "Prepare" and then "Mark as Final" as shown in the
screen clip below.

A small dialog box will open after you
click on "Mark as Final" telling you "This document will be marked as
final and then saved." You should click on OK, which will cause a
second dialog box to open with more detailed explanation of what is
going to happen, and you should click on OK in that box as well to
confirm your wish to "finalize" the document. No further editing will
be possible after that.
You may now print the document, if necessary as with a
prescription, and close MS Word 2007. Your "merged" document will now
be saved in that patient's Smart Docs, and you should see the preview
of it in your screen.
If you later wish to view the document full screen or print a copy
of it, return to the Smart Docs tab for the patient, select the
document from the list, and click on the "View (read only)" green
button in the upper right area of the Smart Docs screen. As the
document opens up, you will be asked to allow the SQL query to run.
Allow the query to run to open the document, even though no changes to
the document will be made following the query. Read or print the
document as necessary, and then close Word when done.
Marking as final provides one advantage: even if the patient demographics have changed
since the document was originally created, and even if you allow the SQL query to run, the
information in the document will not change. The document will still reflect the info
as it existed when the document was first created. However, this advantage also carries a
disadvantage. Once a document has been finalized, you can no longer use the TCE option to
"Copy and Edit" the document. This is intended for situations like a Medical History form,
where there might be a need to carry forward an original document, but edit some of the
information creating a new version. TCE protects the integrity of your information by keeping the original
document and the new one. However, if the original document has been finalized, "Copy and Edit"
will bring up a finalized document in Word. Once a document is finalized, there is no way
to revert that choice so the document can not be edited in any way. Even more limiting, you can not
even select text from this document to copy/paste into a new document. The only option available is to print
the document exactly as is.
For many documents such as prescriptions, "Finalize" is probably the best choice. For any
document like a Medical History or Progress Report that you may want to update later with new info, skip the "Finalize" step.
Just remember when opening an existing document that the question about the SQL Query determines whether you will get
the original demographics as they were, or if the document will be updated with current
demographics in the merge fields. The correct answer to this choice will be determined by
the type of document and the purpose for reading or printing it.


