Single-Pass Perio Charting
Beginning with Version 3.6.2.2 of TCE, perio charting will have available a single-pass charting system that will enable entry of virtually all perio information in one pass through the mouth. This is in addition to the one pass per measurement type - pocket depths, recession and attachment level - that is implemented in older versions of the program. In addition, the single-path method of charting will also allow single keystroke entry of bleeding, suppuration, both, mobility and furcation involvement levels without having to back up to the previous entry point to enter them.
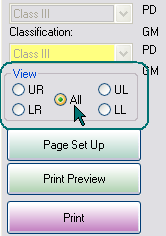 In addition to the information recording path mentioned above, we will also have a quadrant view of the teeth to make more detail easily visible during and after charting. If you are charting in quadrant view mode, as soon as your sequence takes you out of one quadrant and into the next, the quadrant view will automatically shift to the new quadrant. That way, the quadrant containing the currently active entry point will be displayed at all times. To activate quadrant view, simply select the quadrant you desire in the new selection block to the left of the graphic area just above the print function buttons as shown at right. The "All" choice pointed to in the screen clip is the standard view that includes all quadrants. Note that the quadrants are labeled and arranged in the standard view perspective of the patient's mouth.
The implementation of the new single-pass perio charting method does not involve any screen changes in the program. It is automatically available at any time you are entering measurements, regardless of which entry mode you may be in. However, it probably makes most sense to just leave entry mode in the "Pocket Depths" mode since you can make any other entries you wish as you go along recording pocket depths. This discussion of the single-pass method will assume that you are in Pocket Depth mode.
First of all, when in Pocket Depth mode, entry of numbers will enter consecutive pocket depths into the system in the order of the path sequence set by the user just as it always has. However, there are some special keyboard commands that can be entered to switch modes to make a different type of entry. A list of these keyboard commands follows.
To set a different mode for the next entry only:
| p# or d# |
Enters a pocket depth of #mm at the previous entry point |
| r# |
Enters a recession measurement of #mm at the previous entry point |
| w# or g# |
Enters a gingival width measurement of #mm at the previous entry point |
These cover our 3 basic input methods. We have a setting in the drop-down for each of these methods. Which method we are in simply sets the default for any numbers entered without a prefix. If you are in pocket depth mode already and enter a "p#" this is still valid, since people may have a tendancy to do it from habit. It just would not back up to the previous entry point before entering the measurement.
The following codes don't have an associated input method, so the prefix is always needed.
| f# |
furcation marker of grade #, where 0 = none, 1, 2, or 3. |
| m# |
Mobility marker if using whole number entries, where # = 0, 1, 2, or 3. |
| m## |
Mobility marker if using "plus" numbers, where first number is as above for m#, and if the second digit is anything other than 0 (zero), plus will be indicated. Two number entries are required in all cases. Suggestion: enter 2+ to keep it simple rather than 22, 25, 27 etc., all of which also record as 2+. If you want just plain 2, you must enter 20 (two zero). |
| b |
Bleeding marker will be input at the previous entry point. |
| s |
suppuration marker will be input at the previous entry point. |
| c |
Both bleeding and suppuration markers will be input at the previous entry point. You may also enter bs and accomplish the same thing. |
All of the above codes operate in this manner: When the keyboard short cut key is typed, the entry point in the sequence backs up one entry to the last entry point, then the measurement or marker is input, and the entry point advances back to the current point. Example: If you enter a 3 in pocket depth mode at the central location on the buccal of tooth number 3, the 3 will be entered and the entry point will move to the mesial location to await the entry of the next pocket depth measurement. If, instead of a measurement number you enter a keyboard shortcut code, the entry point will back up to the central location, switch to the appropriate different mode if necessary, and accept an entry for the central location. Once the entry is made, the entry point will again move back to the mesial. To put this in more understandable terms, if you just entered 4 and 5 for pocket depths on the distal and central locations of tooth number three and now enter a "b", the system will back up to put a "b" marker where you just input the last measurement and then return to the mesial for the pocket depth measurement there. If you again enter a keyboard shortcut of "r3", the system will back up to the central location and enter a recession measurement of 3mm, then return to the mesial location to await either the next pocket depth measurement or yet another keyboard shortcut code.
For a more detailed example, consider the following entries to be made on one tooth:
PD of 4 with bleeding, PD of 5 with bleeding, suppuration, recession of 2, and mobility of 1+, and then PD of 4 with bleeding. The entry sequence for this would look like this: 4,b,5,b,s,r2,m1+,4 or it could be 4,b,5,c,r2,m1+,4. Commas, of course, are not entered but are used here simply to separate the commands.
A little practice will make this quite easy to use, and it will become nearly second nature to quickly enter an entire perio exam in one pass through the mouth. However, all entries can still be made using the same methods we have always had before with no changes at all. The new keyboard shortcuts are there to use if you wish.
 One vs. Three measurements per tooth for recession and gingival width: Beginning with version 3.7.5, we have added further enhancements to this mode. While three measurements per tooth per buccal and lingual paths is typical of pocket depth probing, some dentists feel that for recession and gingival width, those three measurements are typically the same across any given tooth. Those dentists prefer to have one single measurement entry that fills all three possible locations on a tooth with that measurement instead of having to enter it three times, once at each of the locations. Consequently, we have implemented a default setting in "Settings - Charting - Perio" to let you tell TCE which method you prefer to be your default. Once you set that default, every time you open a perio chart for entries, it will expect either one or three entries per tooth for recession and gingival width as you have chosen for your default.
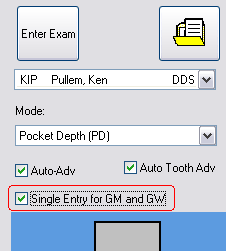
In any patient's perio charting screen, we now have added a checkbox to allow you to change that default setting at any time, both before or during a charting session. You can see that additional checkbox in the screen shot at the right, and it will be either checked or not checked, depending upon your default setting, when you begin your charting session. That way, you know which mode TCE is set for without having to go anywhere else. If everyone in the office does not use the same mode, then you should set your default mode for either the majority preference or the preference of the most important person using the perio charting. The minority users then simply make the one click to switch the mode when they are charting. The good thing about this design is that if the default is set for single measurement entry and that is working just fine for your session but you now reach a tooth where there is some significant variance, you can switch to the three measurement mode on the fly, chart that tooth's measurements, and switch back. Full flexibility!
It is important to note that if you switch the setting away from the default for your session, it is just a temporary switch for that session and the next perio chart you work on will be back to the default setting. If the switch is to be made permanent, you must do that in the "Settings - Charting - Perio" setup area, and that switches the default for everyone in the office.